Manage inbound messages
An inbound message is an email delivered to an Odoo database. Anyone can send an email to an email alias created in the database or reply to an email that was previously sent from the database based on the reply-to header.
Email aliases
Model specific aliases
Some applications have their specific aliases (sales teams, helpdesk teams, projects, etc.). These aliases are used to:
Create a record when an email is sent directly to the alias,
Receive replies to an email initially sent from a record.
Example
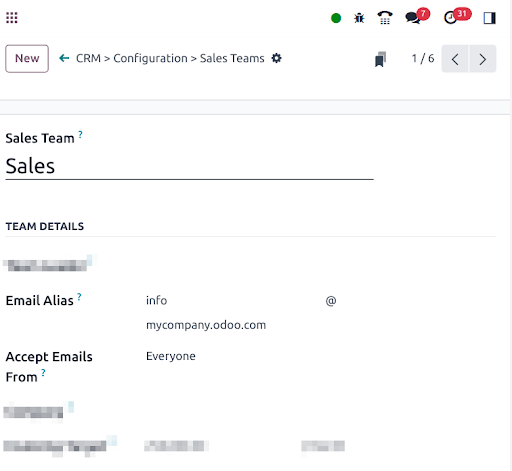
In the example displayed above, sending an email to info@company-name.odoo.com will create a
new opportunity or a new lead automatically assigned to the corresponding sales team. If an email
is sent from the chatter of an existing opportunity, the reply-to will be
info@company-name.odoo.com. The reply will be posted in the right chatter, according to the
message-id header.
Catchall
If an application does not have an alias, a generic fallback alias is used: the catchall. An email sent from a chatter has a reply address set to this catchall alias. A reply sent to the catchall is posted to the right chatter thanks to the message-id header.
By default, the local-part catchall will be used. Enable Developer mode (debug mode) and go to to access the configuration.
An email to the catchall always needs to be a reply to a previous email sent from the database. If an email is sent directly to the catchall, the sender will receive the following message:

Note
The email address info@company-name.com displayed in the screenshot above is the email address
set on the company. Upon entering the developer mode on a company profile, additional
configuration options (such as catchall and bounce) become readable. It can be modified by
clicking on the internal link of the Email Domain. It is generally not recommended to modify
these options unless specific needs dictate, as it will affect all replies to previously sent
emails.
Example
An alias can be configured on a sales team in the CRM app. When a customer replies to an email
coming from the CRM app, the reply-to is info@company-name.odoo.com.
When an email is sent from the Contact app, the reply address is catchall@company-name.odoo.com
because there is no alias on the contact model.
Note
It is advised to keep the local-part of the catchall and the bounce unchanged. If this value is modified, previous emails sent from the database will still have the previous local-part values. This could lead to replies not being correctly received in the database.
Bounce
In the same way the catchall alias is used to build the reply address, the bounce alias is used to build the return-path of the email. The return-path is used when emails cannot be delivered to the recipient and an error is returned to the sender.
By default the name bounce will be used. Enable Developer mode (debug mode) and go to to access the configuration.
Note
On Odoo Online, when using the default outgoing email server, the return-path address is forced
to the value bounce@company-name.odoo.com independently of the value set as bounce alias.
When an error occurs, a notification is received and displayed in a red envelope in the chatter. In
some cases, the red envelope can just contain a no error message, meaning there is an error that
could not be handled by Odoo.
A notification will also be displayed in the Discuss icon on the navigation bar.
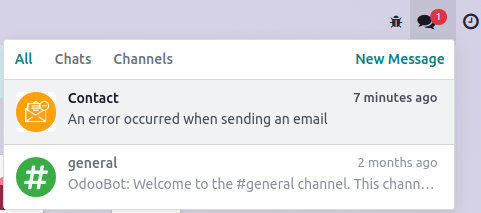
Example
If the email address of the recipient is incorrect, by clicking on the red envelope in the chatter an error message containing the reason for the failure will be given.

Receive emails with Odoo’s default configuration
On Odoo Online and Odoo.sh, the email alias, reply, and bounce addresses are pre-configured. These addresses use the alias domain automatically added to a standard database.
Example
Assuming the database URL is https://mydatabase.odoo.com, the alias domain
mydatabase.odoo.com is automatically created. Catchall and bounce can be used and their address
is respectively catchall@mydatabase.odoo.com, and bounce@mydatabase.odoo.com.
If the CRM app is installed, and a sales team with the alias info is created, the
info@mydatabase.odoo.com address can be used immediately. The same goes for any other alias
created in other applications.
The database domain is ready to be used to receive emails without any additional configuration.
Use multiple Odoo subdomains
On Odoo Online, the only Odoo subdomain is the one defined at the database creation.
On Odoo.sh, it is possible to use several Odoo subdomains. In the settings of the branch, additional Odoo subdomains can be added as long as they are not used yet in another branch. These domains must then be added to the alias domains to be used by a company.

Use a custom domain for inbound messages
The alias domain must be selected in the general settings. If you have multiple companies, each one must be configured.
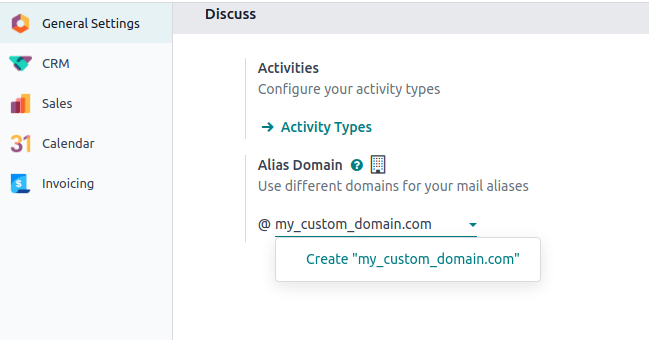
All the aliases will use this custom domain. Replies on models for which an alias is configured
are done to [alias]@my-custom-domain.com. Replies to other models are sent to the catchall through
catchall@my-custom-domain.com.
Important
If emails are sent using Odoo’s email servers while using a custom domain, follow the “Using a custom domain with Odoo’s email server” instructions.
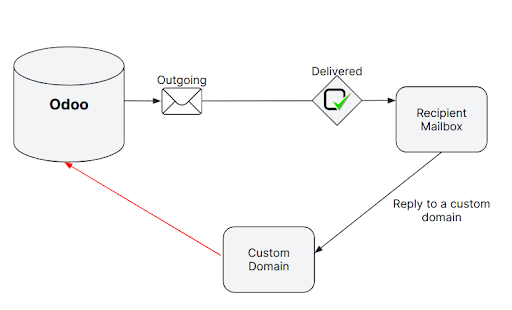
Since this custom domain is used, all emails using an alias (replies, bounces and direct sends) are sent to an address of the domain. They are thus delivered to the email server linked to the domain (MX record). To display them in the chatter or to create new records, it is necessary to retrieve these incoming emails in the Odoo database.
Method |
Benefits |
Drawbacks |
|---|---|---|
Easy to set up, emails are directly sent to the database. |
Each alias of a database needs to be configured. |
|
Allows to keep a copy of the email in your mailbox (with IMAP). Allows to create records in the chosen model. |
Depends on a CRON, meaning emails are not retrieved immediately in the database. Each alias of a database needs to be configured. |
|
Only one record needs to be created to make all aliases work properly. |
Using a subdomain is required. Requires advanced technical knowledge. |
Important
For on-premise databases, the redirection and the MX record methods also require configuring the mail gateway script. Going through this script requires advanced technical and infrastructure knowledge.
Important
Refer to your provider’s documentation for more detailed information on how to handle the methods detailed below.
Redirections
If the database is hosted on Odoo Online or Odoo.sh, using redirections is recommended. They allow messages to be received without delay in the database.
It is mandatory to redirect the catchall and bounce address to the Odoo subdomain of the database. Every other alias used must be redirected as well.
Example
With one sales team, the following redirections are required:
catchall@company-name.com→catchall@company-name.odoo.combounce@company-name.com→bounce@company-name.odoo.cominfo@company-name.com→info@company-name.odoo.com
Important
Some providers ask to validate the redirection by sending a link to the target email address. This procedure is an issue for catchall and bounce since they are not used to create records.
Modify the catchall value on the mail alias domain. Developer mode (debug mode) must be enabled to access this menu. For example, it can be changed from
catchalltotemp-catchall. This will allow to usecatchallas the local-part of another alias.Open an app that uses an alias. For example, CRM contains aliases for each sales team. Set
catchallas the local-part of the alias of a sales team.The validation email will create a record in the CRM app. The email sent will be visible in the chatter, allowing you to validate the redirection.
Do not forget to change back the alias of the sales team and the catchall value on the mail alias domain, just as they were before this procedure.
Note
An alternative to redirections is forwarding. With forwarding, the address forwarding the email will be identified as the sender, while with redirections, the original sender will always remain.
Incoming mail servers
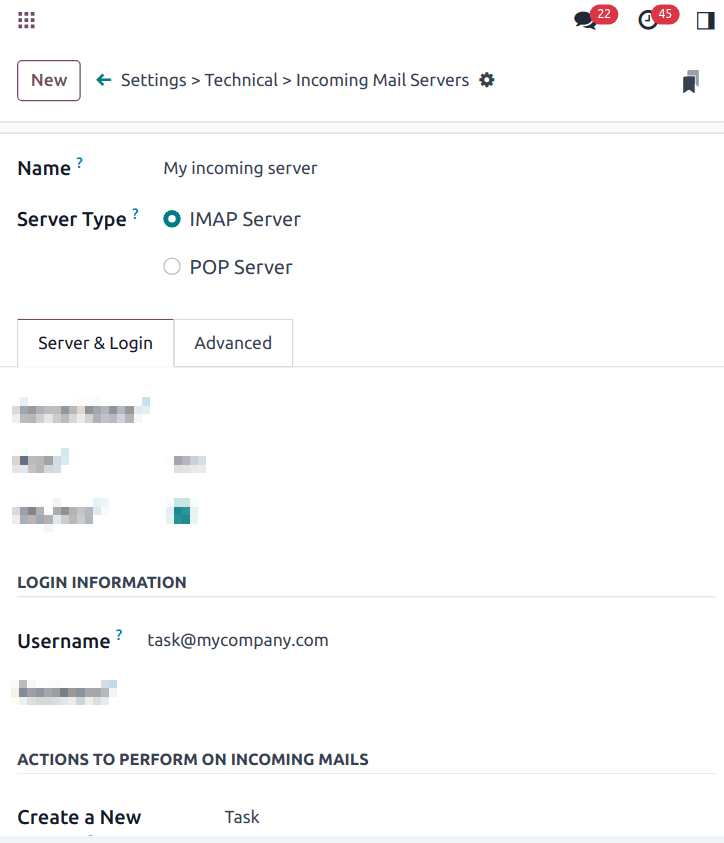
As mentioned earlier, using redirections is the recommended method to receive emails in Odoo. However, it is also possible to set up incoming mail servers. Using this method means creating an incoming email server for each mailbox on your server, catchall, bounce, and every alias of the database, in order to fetch all incoming emails. Incoming mail servers are created by going to .
Important
We recommend using the IMAP protocol over the POP protocol, as IMAP fetches all unread emails, while POP fetches all the emails’ history and then tags them as deleted in your mailbox.
Tip
It is also possible to connect a mailbox through Gmail with Google OAuth or Outlook with Microsoft Azure OAuth.
Regardless of the protocol chosen, emails are fetched using the Mail: Fetchmail Service scheduled action.
Additionally, using an incoming mail server in Odoo gives the opportunity to create new records in a specified model. Each incoming mail server can create records in a different model.
Example
Emails received on task@company-name.com are fetched by the Odoo database. All fetched emails will
create a new project task in the database.
MX record
A third option is to create a MX record in your DNS zone which specifies the mail server managing emails sent to your domain. Advanced technical knowledge is required.
Important
This configuration only works with a subdomain on the Odoo Online or Odoo.sh infrastructure
(e.g., @mail.mydomain.com)
Below are presented some specifications depending on the hosting type:
The custom subdomain must be added to your Odoo Portal.
The custom subdomain must be added to the settings of the project:

Infinite email loops
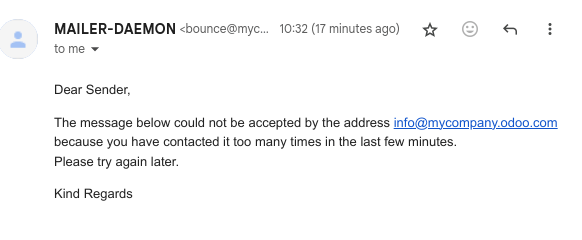
In some cases, infinite mailing loops can be created. Odoo provides some protection against such loops, ensuring the same sender cannot send too many emails that would create records to an alias in a specific time span.
By default, an email address can send up to 20 emails in 120 minutes. If more emails are sent, they are blocked and the sender receives the following message:
To change the default behavior, enable Developer mode (debug mode), then go to to add two parameters.
For the first parameter, enter
mail.gateway.loop.minutesas the Key and choose a number of minutes as the Value (120is the default behavior).For the second parameter, enter
mail.gateway.loop.thresholdas the Key and choose a number of emails as the Value (20is the default behavior).
Important
These parameters are only used to prevent the creation of new records. They do not prevent replies from being added to the chatter.